
After reinstalling Debian—whether version 10 (Buster) or 11 (Bullseye)—one of the most common headaches is losing your network configuration. If your setup uses bonded interfaces (LACP / 802.3ad) for redundancy, the reload wipes out all those settings. The system comes up, but there’s no proper connectivity until bonding is restored. This guide walks through the exact steps we follow at SupportPRO to bring the network back up after a reload, get the bonds working again, and make sure SSH is accessible. This process is crucial for server performance, high availability, and Linux network configuration.
Step 1: Find the Correct Interfaces
Start by listing your interfaces:
ip a
You’ll usually see something like eno1, enp9s0f0, or similar. The one with the smaller number is typically your public NIC. Make note of both interfaces that are connected to your public network — you’ll need them for bonding. Identifying accurate NICs is essential for Debian network bonding configuration.
Step 2: Bring Up a Temporary Network
Before setting things up permanently, it’s easier to create a temporary connection so you can install packages or fetch updates. Adjust interface names and IPs as needed for your server:
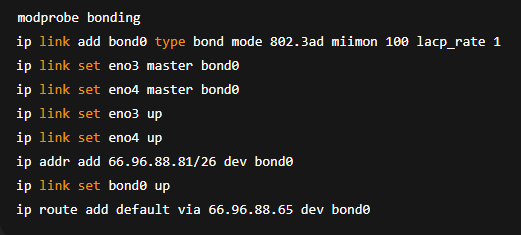
Once this is done, check if you can ping an external host (for example, 8.8.8.8). If that works, you’re good to move on.
Step 3: Update and Install Required Packages
Next, refresh the package index and install a couple of tools that help with bonding:

If this step fails, it’s usually because the Debian repository URLs are outdated — that’s common when working with older versions. This ensures tools like ifenslave required for Linux bonding setup work correctly.
Step 4: Fixing the Repository List (for Debian 10)
Debian 10’s repositories have moved to the archive servers. You’ll need to point APT to those.
Open /etc/apt/sources.list and replace the contents with:
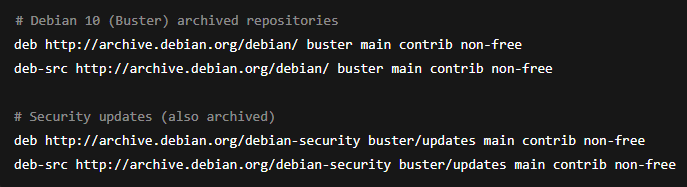
Then run:
apt update
That should fix the issue and let you proceed with package installation.
Step 5: Set Up the Bonding Configuration
Now it’s time to make the bonding configuration permanent.
Edit the network configuration file:
nano /etc/network/interfaces
Add or replace the content with:
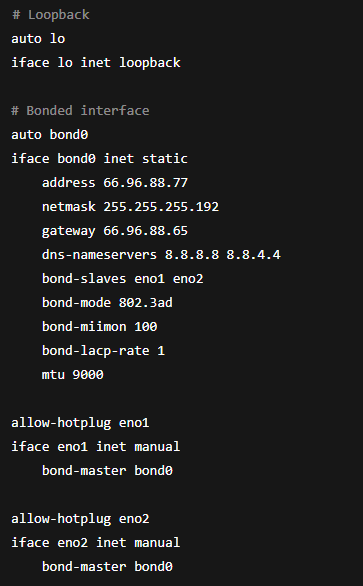
Replace eno1 and eno2 with your actual interface names — check using ip a if unsure.
Step 6: Restart the Network
To apply the configuration:
systemctl restart network
After restarting, your data center team will need to rebond the ports on the switch. Once they’ve done that, the system should come back online with full internet access.
Step 7: Check SSH Settings
If SSH isn’t accessible, open /etc/ssh/sshd_config and make sure this line is present (or uncommented):
PermitRootLogin yes
Then restart SSH:
systemctl restart sshd && systemctl restart ssh
Step 8: Verify Access and Reboot
Try logging in via SSH:
ssh root@your-server-ip
If it connects, reboot the server once to confirm the changes persist:
reboot
After the reboot, your bonded interface (bond0) should be up and stable.
Quick Recap
| Step | Action | Purpose |
| 1 | Identify interfaces | Determine public NICs |
| 2 | Temporary setup | Enable short-term connectivity |
| 3 | Install tools | Add ifenslave and net-tools |
| 4 | Fix APT sources | Update repositories if needed |
| 5 | Configure bonding | Edit /etc/network/interfaces |
| 6 | Restart & notify DC | Activate bonding on both ends |
| 7 | Enable SSH | Allow root login if blocked |
| 8 | Verify | Test connectivity and reboot |
Final Thoughts
Once you’ve done this process a few times, it starts to feel pretty straightforward. The tricky part is just getting that temporary connection up long enough to install the right tools. After that, it’s mostly about following the steps in the right order and making sure your data center rebonds the ports on their end.
Bonding’s a small task that makes a big difference. You get better uptime, load balancing, and peace of mind knowing your public network won’t drop because of a single cable. We at SupportPRO do this routinely for hosting providers worldwide, so if you’d rather not wrestle with it yourself, we can take care of it anytime.This makes Debian network bonding, Linux server optimization, and high-availability networking much easier for your infrastructure.
Facing issues?
Our technical support
engineers can solve it.

