
CyberPanel is a modern, fast, and secure hosting control panel powered by OpenLitespeed. CyberPanel provides a graphical interface for Linux server management, and a one-click installation of LSCache, WordPress, Prestashop, Joomla, and git. It automates the initial setup for components like DNS, Mail service, and SSL certificates to reduce the time it takes to get set up for hosting. CyberPanel is free and Opensource running on the OpenLiteSpeed web server and can add multiple domains. CyberPanel arrives in two versions CyberPanel and CyberPanel Ent. This article focus on steps to perform Migrations with CyberPanel.
CyberPanel to CyberPanel Migration
If you need to transfer your website between two CyberPanel without losing any data, follow these steps.
Backup Creation | Source server

1. Log in to your CyberPanel admin dashboard (Source server)
2. Navigate to the Backup section and click the ‘Create Backup’ option.
3. Select the website you want to create the backup and the destination to store the backup file.
4. Click on the button “Create backup” to start the backup process.

5. You can see a successful message after the completion of the backup.
Backup location /home/yourdomain.com/backup/backupfilename
6. To download the backup Remotely (Destination server) using wget command.
- Move the backup file to the document root of your website
mv /home/yourdomain.com/backup/backupfilename home/yourdomain.com/public_html - Correct the file permissions
- Log in to the destination server and type the command below to download the backup file.
wget yourdomain.com/backupfilename - To restore a backup using CyberPanel, you have to create a directory “backup” at /home on the destination server.
cd /home
mkdir backup
Please note that the backup restore works only with backups generated through the backup generation tool in CyberPanel.
Restore Backup | Destination server

- Log in to your CyberPanel admin dashboard (Destination server)
- Navigate to the Backup section and click the ‘Restore Backup’ option.
- Select the backup file from the drop-down list.
Note: CyberPanel ‘Restore Website’ will detect backups under /home/backup - Click on the button “Restore” to start the restore process.
- You will see a successful message after the restoration.

cPanel to CyberPanel (Manual migration)
Backup Creation | Source server
Download necessary files from the cPanel server (Source server)
- Log in to your cPanel account
- Go to cPanel File manager
- Select the public_html folder
- Select and compress all files in the public_html folder which are necessary for the website.
A compressed file will be present under the public_html folder, you can select this file and download it to your local computer. If the file size is larger we recommend you use alternative methods to transfer the compressed files without locally downloading the file.
Alternate methods to transfer files
By using wget from SSH at the destination server.
By using the SCP command from SSH at the sending server.
By using FTP to download files to the PC and then upload it to the destination server. - Export the website database backup from cPanel using the PHPMyAdmin option.
Note: You can use these steps for other control panels (Plesk, DirectAdmin) as long as you can perform a backup from the original hosting using the control panel backup tools, or via the File Manager and PHPMyAdmin directly.
Add the website on CyberPanel | Destination server (CyberPanel)
- Login to your CyberPanel hosting control panel.
- Navigate to “Websites” on the left-hand side of your dashboard and click on the option “Create Website”. Provide necessary information and the exact URL of the website to be created.

Upload contents on CyberPanel | Destination server (CyberPanel)
After completing the website creation process, we can upload the content that is exported from the cPanel server to the CyberPanel server (Destination server).
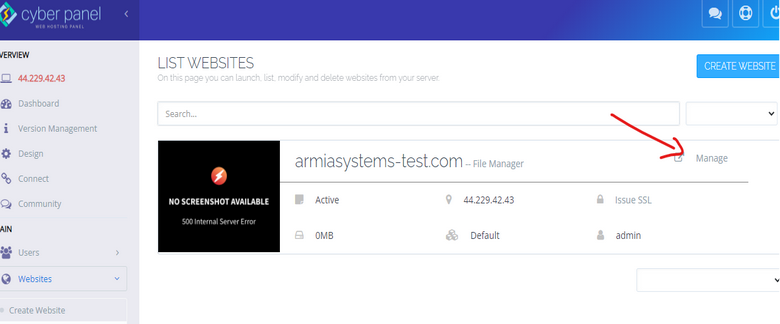
- Navigate to “Websites” on the left-hand side of your dashboard and click on the option “List Website”. Here you can find all websites that have already been created.
- Click on the manage button to open the website management dashboard.
- Open the File Manager option on the website manager dashboard.
- Navigate to the public_html directory.
- Upload the compressed file downloaded from cPanel to the public_html directory (Destination server).

- Extract the compressed file to retrieve files in it.
Create a database in CyberPanel | Destination server (CyberPanel)
- Navigate to “Databases” on the left-hand side of your dashboard and click on the option “Create Database”.
- Select the website and provide the required information.
- Click on the “Create Database” button.

Import the database to Cyberpanel | Destination server (CyberPanel)
- Navigate to “Databases” on the left-hand side of your dashboard and click on the option “PHPMyadmin”.

- Select the database and import exported database from cPanel.

- Verify the website using a temporary host record on your local machine or use https://www.skipdns.link/
- Update the DNS record pointing to the new server.
If you require help, contact SupportPRO Server Admin
Facing issues?
Our technical support
engineers can solve it.

